Recipes
My mother was a university Home-Economics professor who started my cooking lessons when I was five. I loved it. By the age of eleven, I was baking my own bread from scratch. To me, cooking is another form of artwork that combines ingredients, balance, timing and chemistry.Use links below to view the recipes. In many cases you can substitute Authentic Foods cake flour for gluten-free versions of older recipes. I recommend Authentic Foods cake flour to substitute for regular flour or their bread flour blend for butterscotch rolls, cinnamon rolls, kolatches, or glazed raised donuts.
GLUTEN-FREE DESSERTS:
Angel Food Cake
Begin by preheating your oven to 425 degrees while the empty angel food cake pan is in it (the heat of the metal will sear the batter as you pour it in to seal the pan). Then prepare the dry mix you'll eventually fold into the batter below (note, this can be done in advance and set aside for days if need be). Sift together 2-3 times:
1 cup Authentic Foods GF cake flour
1 cup powdered sugar
1 cup sugar
Set aside the dry ingredients in a bowl. Now beat together:
1 1/2 to 2 cups Egg White (if using liquid egg white decrease your ice water by a teaspoon)
1 heaping tsp cream of tartar
1/4 teaspoon salt
5 teaspoon ice water
1 1/2 teaspoon real vanilla extract
Gently fold the dry ingredients into the egg white mix, then pour the batter into the pre-heated angel food cake pan. Cover with aluminum foil and bake at 425 degrees for 15 minutes, then remove the aluminum foil and continue baking for another 10-15 minutes.
As soon as you pull the pan out of the oven, turn it upside down until the cake is completely cool (at least 4 hours). Cut out of the pan with a flat knife.
1/2 cup unsalted butter
2 oz unsweetened chocolate (Note: for a darker chocolate taste, increase to 2 1/2 oz)
4 oz semi-sweet chocolate (this is about 2/3 cup of semisweet bits)
Now stir in (in this order unless you want to sift all the dry ingredients together first):
3 large eggs
2 teaspoons real vanilla extract
1/2 teaspoon salt
1/2 teaspoon baking powder
1/2 teaspoon xantum gum
1/2 cup brown sugar
3/4 cup granulated sugar
2/3 cups gluten free flour blend (which is available for purchase from glutenfree-supermarket.com/)
1 cup chopped pecans
Bake in a greased 9x9 pan at 325 degrees until done (about 45 minutes).
First, mix dry ingredients together with an electric mixer:
1 3/4 cups gluten free flour blend (available from www.glutenfree-supermarket.com/flourblend.aspx)
1/3 cup unsweetened cocoa
1/2 cup sugar
1/2 teaspoon xantum gum
1 tablespoon baking powder
1 teaspoon baking soda
1/2 teaspoon salt
Now add into your mixer bowl:
2 large eggs
1 cup buttermilk (or a little more if you need to use some up)
2 tablespoons canola oil
1/2 teaspoon vanilla extract
1 tablespoon chocolate extract
Use two long handled teaspoons to drop a heaping teaspoon of batter in the fryer at a time. (Note: I do NOT roll in rice flour as recommended in the cookbook). They'll tend to turn over on their own when a side is done. Take out when nicely browned using a slotted spoon or fork and lay on paper towels to soak up the extra grease. These are great hot but can also be frozen for later. You can dust them with powdered sugar if you wish.
Whisk together (adding one at a time):
1/4 cup egg white
2 tablespoons melted butter
1 tablespoon virgin olive oil
1 cup whole milk
Add:
542 grams (19.1 oz)
Mix together and let sit 10 minutes before adding to the mix above:
1/4 cup warm whole milk
1 tablespoon sugar
1 package yeast
1 teaspoon Steve's GF flour blend)
Now add 1 cup warm milk and mix until the dough comes together. Flatten and cut with a regular donut cutter. To rise, you can microwave a cup of water until it's boiling, then put your donuts in the microwave with the water but DO NOT MICROWAVE. Simply shut the door and you have the perfect warm, moist spot for it to rise. To cook your donuts, preheat a hot air fryer to 390 degrees. Lightly spray the bottom of the donut with oil, then cook for five minutes until golden brown. To glaze, dip in powdered sugar diluted with water and a bit of vanilla extract. These are fabulous fresh-cooked.
1 cup semisweet chocolate bits
1/3 cup peanut butter
Then stir in:
4 cups gluten-free brown rice cereal
Press the rice mix into a buttered 9x9: pan. Let stand at room temperature until hardened, then cut and serve.

2-3 egg whites
1/2 cup sugar
1/2 teaspoon real vanilla extract
Pinch of baking powder
Pinch of salt
1/2 teaspoon xantum gum
1 tablespoon oil
2 tablespoon milk
1/2 cup plus 2 tablespoons loosely packed potato starch
Drop a tablespoon at a time onto a really well-greased cookie sheet (don't forget or you won't be able to get the cookies off it) and bake in a preheated over at 375 degrees until the edges are medium to dark brown (not just golden). The bottoms should be brown or you'll end up with a chewie cookies instead of a crisp one (about 12 minutes). Quickly fold over (adding a prepared fortune if you wish) and stick the points upside down in a muffin tin until cool (it helps them hold their shape). It's not a bad idea to only bake about 4-6 at a time because they harden up fast on the sheet.
Filling Recipe #1
Mix together:
2 eggs
16 ounce can pumpkin
3/4 cup sugar
1/2 teaspoon salt
2 teaspoons pumpkin pie spice
1 1/2 cup cream
OR
Filling Recipe #2 (which I like better)
Mix together:
15 ounce can pumpkin
3/4 teaspoon ground cinnamon
1/2 teaspoon ground nutmeg
1/4 teaspoon ground ginger
1/4 teaspoon ground cloves
1/2 teaspoon sea salt
14 oz can sweetened condensed milk
2 eggs
Bake in a preheated oven at 425 degrees for 15 minutes then reduce temperature to 350 degrees and bake for another 40-45 minutes.
Cream together in a mixer:
3/4 cup unsalted butter (do NOT substitute margarine or shortening)
1 cups sugar
Then add (mixing well after each):
1 egg
1 tablespoon vanilla
1/4 teaspoons salt
1 teaspoons baking powder
1 teaspoon xantum gum
1 3/4 cup brown rice flour mix (see below)
1/4 cup sweet rice flour Brown Rice Flour Mix
2 parts superfine brown rice flour
2/3 part potato starch
1/3 part tapioca flour
For this recipe, this would be about:
1 1/2 cups plus 2 teaspoons superfine brown rice flour
3 Tablespoons plus 1/3 teaspoon potato starch
6 Tablespoons plus 2/3 teaspoon tapioca flour
For fast sugar cookies, drop round balls on a butter-greased cookie sheet, and flatten using the bottom of a glass dipped in granulated sugar. Then sprinkle with colored sugar and bake.
If you want to use a cookie cutter to make shapes, roll the dough out to 1/4" thick between sheets of waxed paper. Then put the rolled out dough-sheets in the refrigerator or freezer, laying them flat. Let them chill for several hours, until hardened.
Take the sheets out to work with one at a time, leaving the others in your fridge to stay cold. Carefully pull one side of the waxed paper up off of the dough, freeing it up, then let the waxed paper lay lightly back down so you can flip the dough-sheet over. Repeat the process of freeing the other side of the waxed paper off of the dough, trying not to mess up your flattened shape. (NOTE: If you take too long to do this, the whole thing has to go back in the refrigerator or freezer to re-harden.)
The purpose of doing this maneuver is to make it easy to pull the dough off the waxed paper without distorting your shape when you cut it with your cookie cutter. So, with the dough both cold and not stuck to the waxed paper, you can quickly cut out your cookies and pop them onto a cookie sheet for baking. If you have problems with the dough still trying to stick to your waxed paper, or you need to roll out the dough again with the leftover pieces of dough from cutting out your cookies, try dusting the waxed paper lightly with a 50-50 mix of granulated sugar and flour before putting the dough on it. And remember to put your freshly rolled out leftover dough back in the refrigerator to re-harden.
Once the cookies are cut out and on your greased cookie sheet, you can decorate them generously with colored sugar. It's easy to make your own colored sugar by simply adding powdered or liquid food coloring to granulated sugar and shaking it up. However, if you use liquid coloring, you'll need to make it at least a day in advance to give it some time to dry (which is just one reason why I only buy powdered food coloring). If possible, chill again on the cookie sheet before baking.
Bake the cookies at 350 degrees until lightly browned.
Cream together in a mixer:
1/2 cup shortening
1 cup sugar
Then add (mixing well after each):
1 egg
1/2 teaspoon vanilla
1/4 teaspoons salt
2 ounces melted unsweetened baking chocolate
1 cup GF all purpose flour
1 cup GF uncooked oatmeal
I like to roll it out directly on a heavily greased cookie sheet using a top layer of wax paper
If you want to use it for ice cream sandwiches, roll to 1/8" thick. Use a pizza cutter or a knife to cut them into squares the size you want, then bake them at 350 degrees for ten minutes. They'll be soft, so be careful when removing them from the sheet to cool.
If you want crunchy wafters, roll the dough as thin as you can, cut them into the sizes you want with the pizza cutter or knife and bake them at 375 degrees for as long as it takes to get them browned. You'll be able to smell when they're done, and smell if they're burned, too! I usually shoot for around 25-30 minutes. Gently remove them right away and place them on a cooling rack. I've found them VERY popular at parties.
GLUTEN-FREE CANDY
Caramels and Turtles
A word of warning. You need a good candy thermometer and a really BIG heavy saucepan to make this. As it cooks, it expands about 10 times or more in size. This recipe comes from an old Joy of Cooking cookbook (something that should be in every cook's kitchen).
Mix together in a large pan:
2 cups sugar
2 cups dark corn syrup
1 cup butter
1 cup heavy cream
Cook over moderate heat, stirring constantly, until just under the firm ball stage at 244 degrees Fairenheit. Then remove and gradually add:
1 cup heavy cream
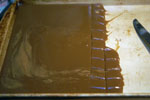
Return to the heat and cook to the firm ball stage of 244 degrees Fairenheit. Pour out only a heavily buttered pan (it will need at least a half inch edge on it). Allow to cool for three hours. Invert onto a wood board and cut with a sharp knife.
CHOCOLATE COVERED CARAMELS
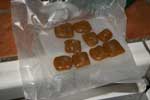
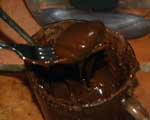
Cut your caramel into squares and place on waxed paper in the refrigerator or freezer to harden. Meanwhile, melt your preferred type of chocolate (whether milk, semi-sweet, dark, or bitter) in a glass dish in the microwave. This is best done in bursts of 15-20 seconds, stirring in between so as not to burn it. Once it is a smooth, liquid consistency, dip the chilled caramel squares into the chocolate using a fork. Allow excess chocolate to drain back into the glass dish, then place your chocolate coated caramels on waxed paper to harden.
TURTLES
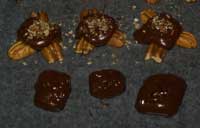
The only hard part of this is making your caramel. Lay out groups of three pecan halves on a sheet of waxed paper. One end of each pecan half should stick out, while the other end touches that of the other pecans. Squish a small ball of caramel over where the pecan ends come together. Then, melt milk or semi-sweet chocolate in a glass container in the microwave. Use a spoon to drop a dollop of melted chocolate over the caramel, swirling it slightly for a nice, round, smooth shell. Allow to harden at room temperature.
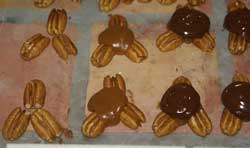
(This picture shows the stages for making turtles)
Knead together:
8 oz gluten-free cream cheese
2 pounds powdered sugar
1/2 teaspoon peppermint extract (cut this way down if you are using peppermint oil)
Divide into small balls the size of a cherry and squish into molds or flatten with the bottom of a glass dipped in granulated sugar. Put onto sheets of paper towels for 24 hours, then remove and store in a sealed container in your refrigerator or freezer. These are a great sweet to make ahead of time for parties because they store so well.
VARIATIONS
For chocolate-covered mints, make the mints as described above, then freeze until hard. Melt whatever chocolate type you prefer (milk, semi-sweet, or bitter) in a microwave. Using a fork, quickly dip the frozen mint patties into the chocoate and hold it up again to let excess chocolate drain back into your bowl. Then set on waxed paper to cool. When hard, store in a cool location.
For fondant, use only the cream cheese and powdered sugar, leaving off the peppermint flavor. Form into balls and add nuts of whatever type you prefer (such as almonds or pecan halves) before dipping in chocolate.
Stir together:
1 cup sugar
1/2 cup white corn syrup
1 cup raw spanish peanuts (Note: if substituting roasted nuts of any kind, make sure they were roasted to be gluten-free and add after cooking the sugar and corn syrup for 4 minutes)
Microwave on high for 4 minutes. Stir in:
1/8 teaspoon salt
Microwave on high for 3-5 minutes or until light brown. Then add, blending well:
1 teaspoon butter
1 teaspoon vanilla
Microwave 1-2 minutes. Gently stir in:
1 teaspoon baking soda (for fluffier brittle, this can be increased to 1 1/2 teaspoons)
When stirring in the baking soda has turned the mix light and foamy, gently pour out onto a well-buttered cookie sheet. Cool and break into pieces. This can be used to make any kind of nut brittle, although I probably like the peanut brittle best.
FROSTINGS
Buttercream Icing
1 teaspoon melted butter
1/2 teaspoon vanilla extract
Powdered sugar
Milk
Alternate adding the powdered sugar with small amounts of milk for a smoother texture. It generally works best to create a stiff paste with the powdered sugar, then stir in milk for better consistency. Repeat adding the powdered sugar and milk several times. You'll notice the icing getting smoother.
This freezes well if you want to make a batch ahead and save it.
5 ounces semisweet chocolate
1/2 cup sour cream
pinch of salt
Mix together. If you find the icing too thick (too much like fudge), add more sour cream to the mix for a softer, more malleable frosting.
Another variant of this (if you don't like the taste of sour cream) is to melt together:
1 cup semisweet chocolate bits
1 Tablespoon butter
Add milk or more butter to make your desired thickness and you can have a great fudge topping for ice cream.
EXTRAS
Cranberry Salad
1-1 1/2 cup sugar or splendida (fewer calories but less juicy)
1 package (4 cups) chopped cranberries
2 peeled apples chopped up into small bits
1 orange (with rind - may need to use a grinder)
Green grapes, cut in half
Chopped pecans and/or English walnut pieces
Where you don't see an amount given, it's because you just add whatever you desire. Likewise, the sugar is added to taste.
This can last for up to about a week in the refrigerator, but is best eaten fresh. It can be garnished with Mandarin orange slices.
2 egg yolks or 1 whole egg
1 teaspoon oil
1 teaspoon water
pinch of salt
gluten-free flour (I use my regular blend)
Add enough flour to make a thick dough. Roll thin and cut into strips and take it off your cutting board using a spatula. Cook in your simmering chicken broth or soup until done (it only takes a minute or two). Enjoy.
1/4 cup potato flour
1/2 cup tapioca flour
3/4 tsp baking powder
1/4 tsp xanthan gum
1/4 tsp salt
1/2 tsp garlic powder
Now mix in:
2 large eggs
1 cup milk
1/4 cup canola oil
1 teaspoon parsley
4 oz shredded cheese
1 tsp chives
2 cups raw shredded potato
Spoon out into flattened disks in a well-greased electric skillet at 350 degrees until brown, flipping once the first side is done.
FAMILY CLASSICS
Angel Food Cake
First: Preheat your oven with the angel food cake pan in it to 425 degrees.
Lightly froth:
1 1/2 cup fresh egg whites
Then add to the egg white froth:
1 tsp cream of tartar
1/4 teaspoon salt
2 Tablespoons ice water
1 teaspoon vanilla extract
Beat until it creates firm peaks (but not dry).
Now prepare the dry mix you'll eventually fold into the above. Sift together 5 times (note: if you stir these together with a spoon before sifting, it goes faster because the mix moves through the sifter easier):
1 cup sugar
1 cup sifted powdered sugar
1 cup sifted cake flour (NOTE: Do NOT substitute All-purpose flour)
Gently fold the dry ingredients into the egg white mix above.
Gently spoon the batter into the pre-heated angel food cake pan.
Lightly cover the top of the pan with aluminum foil (it doesn't need to be tightly sealed, just lay the aluminum foil over it) and bake at 425 degrees for 15 minutes, then remove aluminum foil from top and bake another 15 minutes.
After it's done, turn it upside down until completely cool (at least 4 hours). Cut out of the pan with a knife.
(This goes great with fresh strawberries.)
Once you have the bread dough ready, rolled it out into a rectangle about 3/8-1/4 inch thick.
Mix the topping for your butterscotch rolls by adding together:
1 cup melted butter
1 1/2 cup brown sugar
3 Tablespoons light corn syrup
Chopped pecans (as many or few as you like)
(Note: This amount for the topping can be cut in one-third if you want to save some bread dough for other purposes, such as plain rolls, cinnamon twists, or a small loaf of bread.)
Pour the butterscotch mix over the rolled out rectangle of dough. Then, starting from one of the long sides, roll it up like a jelly roll. Slice off 1 inch sections and place flat side down in a well-buttered 9x13 inch pan, a little bit apart (not quite touching). Let rise until double before baking at 350 degrees until done.
Once you have the bread dough ready, roll it out in a rectangle about 1/4 inch thick.
Use a knife to spread softened butter generously over the rectancle of dough. (Note: if it's not soft, lay the butter slices out for a bit on the dough before trying to spread it so you don't tear the dough up).
Mix cinnamon with granulated sugar to the amount desired. This isn't rocket science and doesn't need to be precise. Just toss in the amount of cinnamon that gives you a nice, light-brown color and stir it a bit before shaking or spooning it out over the dough.
Now you have a choice:
- For regular cinnamon rolls, starting from one of the long sides, roll it up like a jelly roll. Slice off 1 inch sections and place flat side down in a well-buttered pan, a little bit apart (not quite touching). Let rise until double before baking at 350 degrees until done.
- For cinnamon twists, flop one half of the dough over the other half and cut in 1 inch strips. Starting from one end, twist each strip several times before laying it down on a greased cookie sheet. Bake at 350 degrees unitl lightly brown.
Let cool, then frost with buttercream icing.
Stir the following dry ingredients together:
1 cup flour
1/2 teaspoon sugar
1/2 teaspoon salt
Then whisk together until well mixed:
1/4 cup + 1 Tablespoon oil (i.e. 4 1/2 tablespoons)
1/6 cup cold water
Pour the liquid mix into the dry ingredients and stir them together just enough for them to be blended (over-mixing will make your crust tough).
Roll out the dough between two sheets of waxed paper. Chill in the refrigerator to harden it. Then, take out of the refrigerator and carefully peel off the top sheet of waxed paper, then turn the remaining dough-paper upside-down over the pie pan and let the dough fall gently off the paper into your pan. You can pinch a curved decorative edge to the top of the dough using your fingers before baking.
If you need a pre-baked shell for your pie, bake it at 375 degrees until light brown. Otherwise, fill with your pie mix and bake as per that recipe's directions.
PRUNE-APPLE FILLING
Mix together:
1 cup chopped dried prunes
1/3 cup chopped apple (peeled first so it's without the skin)
1/3 cup chopped pecans
1/4 cup sugar
1 Tablespoon lemon juice
APRICOT FILLING
Mix together:
Chopped dried apricots (I like the tartness of California ones)
Chopped dried cherries
Now it gets a bit different from before. The dough should be rolled out to about 3/16 inch thick. Cut it into 3 inch squares.
Put a dollop of prune filling in the middle of each square. Pull the corners up over the filling and pinch them together. Then, pinch together all of the other dough edges so none of the filling is visible.
Turn the dough ball upside down (so you see only the nice smooth surface, not the pinched-together dough) and allow to rise a bit (don't expect it to get double - that won't happen).
Bake at 350 degrees until light brown. When done, move while still hot to a rack for cooling. These rolls are good when iced.
Dump into your mixer:
1 package yellow cake mix
1 French vanilla pudding mix
1 tsp vanilla
4 eggs
Then add:
2/3 cup less 1 Tablespoon oil
2/3 cup plus 1 Tablespoon boiling water
1/4 cup poppy seeds - which is half of your typical bottle. It is important to soak your poppy seeds for one minute in the boiling water before adding them to your batter.
(NOTE: This isn't as tricky as it sounds. The easiest way is to put a tablespoon of water in the 2/3 cup measuring cup and fill the rest up with oil. I tend to use a light Canola oil or corn oil, but any light-tasting oil will probably work).
Mix together well using an electric mixer (a couple minutes on a medium setting will usually do the trick).
Pour into a greased and floured Bundt pan and bake at 350 degrees until done (anywhere from 35-50 minutes).
Cool for 10-15 minutes in the pan before removing. Allow to finish cooling, then sift powdered sugar over the top for a nice decorative touch.
1 cup warm milk
1/4 cup sugar
1 teaspoon salt
1 cake fresh yeast (NOTE: You can substitute 1 tablespoon of the powdered yeast)
1 egg
1/4 cup oil
Flour as needed
You'll notice there's not an exact amount on the flour. It's usually around 3 to 3 1/2 cups, depending on the type of flour you use. You just want to add enough that you can work with it enough to knead it, but is still a little sticky. Too much flour will make the bread come out tough and tasteless instead of nice and delicate. Knead the dough until it returns briskly when punched. Let rise twice before either baking in a loaf pan, putting as balls into cupcake tins for rolls, or rolling out to a rectangle about 316 - 1/4 inch thick to make parkerhouse rolls (cut into large circles, put 1/2 tablespoon butter in the center and fold over). Bake at 350 degrees.